On this page you will see, which tasks are updated and could open Task Change logs.
2017-01-19
– exist related record – Version 8
This task allows to check for related Records. If your module is not listed within the Dropdown, it is using a non default way to match records, which is not supported.
| Version | Date | Update |
| 8 | 2017-01-19 | Add Function to be source for “generate recordlist” task |
2016-12-22
- send Mail – Version 34,
- frontend confirmation box – Version 1,
- frontend actions – Version 2
send eMail
- could send an email to one or multiple receivers with all default mail options
- Also you could add one or multiple attachments from different places.
- Results from the following modules: PDFMaker and SQLReports
- attach every Document related to the current record
- attach a file from a url, you could generate also from field values
- in Documents module: attach the current file
Store Mail to
From version 600.07 you could specify the record, a mail should be stored.
If you send a quote to a lead, you probably want to see inside the Lead Record, which Mails was send to the lead. This could be done with this field.
You could easily specify a crmid, to which this mail will be stored.
For example:
| $crmid | Will store the mail in every module to the current one (Leave empty will have the same effect) |
| $account_id | Inside Quotes module, will store the mail to the ID from the account_id field. (The Organization of the Quote) |
You must leave this field empty or set a correct ID of a record.
If you set a wrong value, the mail WILL NOT BE SEND.
If you are not sure, what to do, leave this field empty!
Integrate Access Tracker
Use this checkbox only, if you really work with the the values of accessed mails.
Sometimes a 1×1 counter image will be interpreted as spam category.
Statistics
The complete SMTP dialogue will be written in the statistic log, to give you the change to see, why a mail wasn’t send
Templates
If you want to insert Mail Templates into the Mail Content, you only need to select the template on top of the content field.
The template feature is different then the template feature of Vtiger mail form.
It do not directly insert templates into the editor, but load the template and subject during execution.
This ensure to always use latest version of the the selected template and to be able to load templates from different modules.
The subject will be taken from Template, if there is no subject defined within task configuration.
Next to the default variables from the template module, you also could insert custom content into the template, which is defined with the send mail task.
The custom content is taken from editor of send mail task and will insert on position of a $mailtext variable you use within the template.
So you could use defined templates, but also individual content
2016-12-19
send Mail – Version 33
2016-12-06
- CloudFile Upload File – Version 9
- CloudFile Download File – Version 3
- CloudFile rename File – Version 3
- call webservice – Version 9
- sendmail – Version 32
CloudFile Upload File
| Version | Date | Update |
| 9 | 2016-12-06 | Add an option to parse custom parent paths for ID based systems |
CloudFile Download File
| Version | Date | Update |
| 3 | 2016-12-06 | Add an option to parse custom parent paths for ID based systems |
CloudFile rename File
| Version | Date | Update |
| 3 | 2016-12-06 | Add an option to parse custom parent paths for ID based systems |
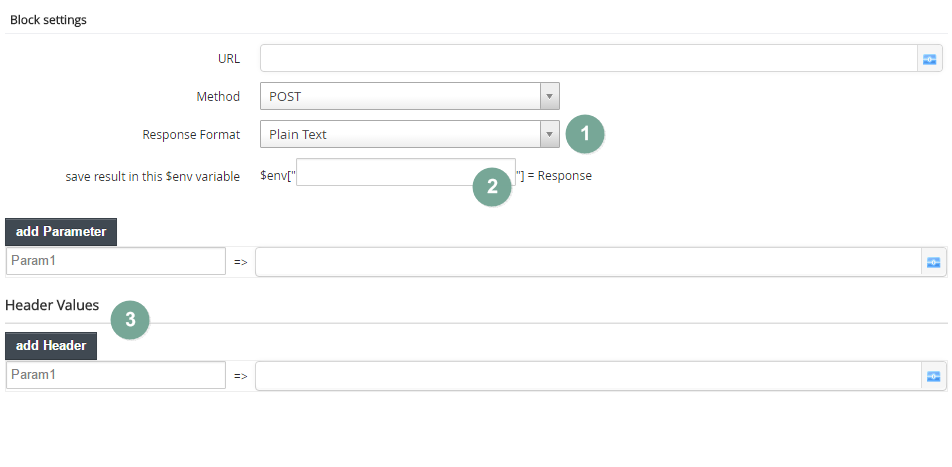
Call Webservice
This task could do a background call to a configured URL and transfer multiple configured parameters.
You could set the Target URL, which could already contain some Parameters you want to transfer.
If you want to send dynamic parameters it is easier to use the “add Parameter” button and add every single parameter to the call.
You could choose if you want to transfer the parameters with GET or POST.
GET means the Parameters will be send in the url like this: “https:/ /<domain>?parameter1=value1&pareter2=value2&…”
POST means the Parameter won’t be send in the URL, but are also added to the request.
This allows bigger amount of data, but must be supported by the webservice.
Since some versions you also could set special Headers you need to communicate with the Webservice. (For example authentication, Response Type, …) (3)
With the setting 1 and 2 from screenshot you could process and store the result you get from the Request. If you parse the JSON, make sure it is valid.
| Version | Date | Update |
| 9 | 2016-12-06 | Fix issue when using “call webservice” together with redirection function |
2016-12-04
Updates related to new Workflow Designer version
New Tasks
Updates
- Start – Version 16
- reverse Inventory – Version 9
- create Inventory – Version 16
- duplicate Record – Version 8
- show notification to user – Version 10
- set values – Version 6
- send email – Version 31
show frontend message
| Version | Date | Update |
| 1 | 2016-12-04 | Initial Release |
Frontend Action
| Version | Date | Update |
| 2 | 2016-12-22 | Update to improve features usable during configuration |
| 1 | 2016-12-04 | Initial Release |
style inventory list
| Version | Date | Update |
| 1 | 2016-12-04 | Initial Release |
Start
This Task is the start point of all workflows and is allowed only once in a workflow.
Options
- run time of this workflow
(Should the workflow executed immediately or asynchronous (asynchronous creates a 1 second delay and execute the workflow with the next cronjob) - parallel execution
If you use a [delay] or [set values] task, it could result in recursive execution, which could result in problems with the server
You should only activate parallel execution if you know you need multiple instances of one Workflow per record - only one execution per Record
Only execute this workflow one time per record. Couldn’t be reset and the workflow couldn’t executed manually, too! - do not store logs of execution
Maybe you recognize a big vtiger_wf_log table. These are the analytics data from Workflow Designer. If you want to save space and don’t need the statistics feature, you can disable logging for this workflow.
Triggers
Are described on dedicated page
Options
Execute this workflow if a record was referenced in another record
Have the same behavior like the “request values from user” task.
allow execution without a related record
If you activate this option, you could start a Workflow from ListView, without choosing a record.
This will increase the usability if you create an export workflow or a workflow, which check some option.
Attention!
Please note, if you don’t choose a related record, every used field value variables, which depend on the current record, will return an empty value!
execute process only once with all checked records in listview
Normally a workflow will be executed one time for every record you selected in ListView.
If you enable this option the Workflow will only be executed with the first record you select and write all selected record IDs comma separated in the $env Variable you configure.
Example
You select 3 records in listview and want to generate one email with data from all checked records.
You enable this option and configure the variablename to “recordids”.
Now you could access the IDs in the variable $env[“recordids”] in the format id1,id2,id3
Apply this condition in any situation to prevent execution
Per default a show/execute condition in start block, will only be used in DetailView or after Creation/Editing.
Then the condition will be checked and if the result is false, it won’t be executed.
This means if you execute a workflow from ListView or by using the Workflow Planer, the condition will NOT be applied, because your configuration have a higher priority.
If you enable this checkbox, you could be sure the Workflow will only be executed in any situation if the condition is true.
Changelog
| Version | Date | Update |
|---|---|---|
| 17 | 2017-01-24 | Add opportunity to force the check of the condition |
| 16 | Add compatibility with Frontend Workflows |
Reverse Inventory
| Version | Update |
| 9 | Fix ID, which is stored in Environment variable |
create Invoice/Quote/SO
The default behavior of this task is equal to the Create Record Task.
This task could be create Invoices, Quotes, … with selected Products. You could specify all values of these modules, like item/group tax or discount.
All other settings are equal to the default record creator.
You could select all products you have created in your vtigerCRM system. Also you could generate the product_id with a custom function.
| Version | Update |
| 16 | Small Improvement to better support PHP Class extending |
duplicate Record
| Version | Update |
| 8 | Fix Record ID, written to Environment variable |
show notification to user
| Version | Update |
| 10 | Fix Assigned User Relations |
Set Value
July 11, 2016 Updated on December 4, 2016
- could change values of records
- You could generate the values you want to set with 3 opportunities:
- static value (Default)
The value will be generated by the default template textbox - function
You could create a custom expression, which returns the new field value. This function needs to be valid custom expression code. You could also use custom expressions in the static values box, but need to use <?php return <expression>; ?> there. - fieldvalue
Load the new value of the field from another field from this or a related record
- static value (Default)
set References
If you want to create a Relation between two records, you need to set the ID of the other record.
Example
You want to create a Contact from Organization and want to set the “Organization” Field to the current Organization.
You only need to set the field “Organization name” to “$id” (not $accountname).
All available ID’s are listed on top of the Drop Down List you get on the blue icon next to the text field. (ID of current Record)
This works for all linked fields and also fields inside Projects, Tickets, Events,.. where you could choose between different modules
Changelog
| Version | Date | Update |
| 6 | 2016-11-28 | Small bugfix with related fields |